


In my previous article, I reviewed how to create tables in SQL and also created a table called “employeeRecords”. The table has five columns: employeeID, firstName, lastName, department and startDate.
In this article, I will update the existing table by adding a new column, inserting data into the new column and updating the records in the table.
Query the table for all its records
SELECT * FROM employeerecords;

Prerequisites
You should have familiarity with the SQL syntax and have an SQL table created.
Alter a Column Name in a Table
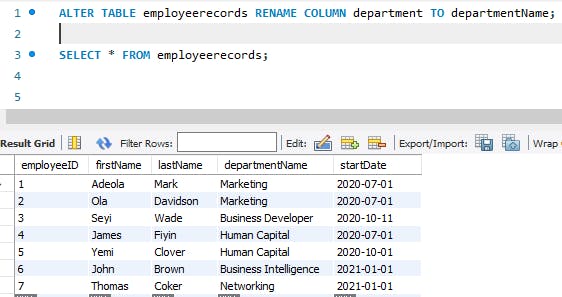
To alter a table, use the SQL ALTER TABLE keywords followed by the table name, the RENAME COLUMN clause, the old column name, the SQL TO keyword, the new column name, and a semi-colon.
ALTER TABLE table_name RENAME COLUMN old_column TO new_column;
Now rename the department column in the employee records table.
ALTER TABLE employeeRecords RENAME COLUMN department TO departmentName;
Then run a select all query and view the change you just made.
Add a new Column
To add a column to an existing table, you use the ALTER TABLE statement to modify the table, then specify the new column name, the data type and possible column constraints (this is optional).
ALTER TABLE table_name ADD COLUMN new_column DATATYPE CONSTRAINT;
Use this format to add a new column to the employee records table.
ALTER TABLE employeerecords ADD COLUMN employeeAddress VARCHAR(100);
Select all columns to view the new column created.
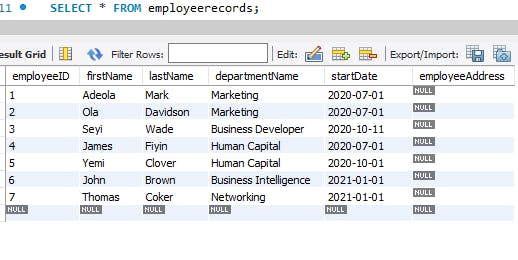
The new column has no records yet. Let’s add some data.
Insert Data into a New Column in SQL
To insert records into the employee address column, you’ll use the SQL UPDATE, SET and WHERE keywords.
UPDATE table_name
SET column_name = 'value_1'
WHERE condition;
Before writing the query for our table, let’s define what a row and a column are.
A column describes an entity and provides details about each entity in a table. In the employee records table, the employeeID column is a number that specifies when the order that employee joined the company. Each employee has an ID unique to them, their first and last names, the department they belong to, and the day they joined the company.
A row is an entity - with attributes about one particular entity. In the employee records table, the first employee has an employee id of 1; their full name is Adeola Mark, who works in the marketing department and joined the company on the 1st of July 2020. All five rows describe Adeola Mark and their attributes.
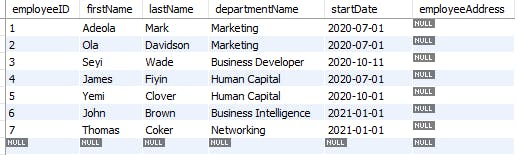
Run a select query on the table again
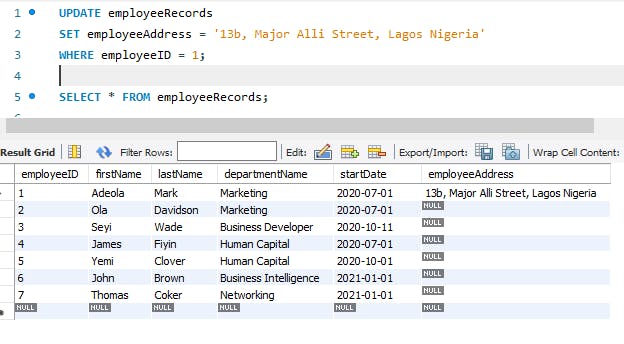
Next, update the address for the first employee in the employeeRecords table.
UPDATE employeeRecords
SET employeeAddress = '13b, Major Alli Street, Lagos Nigeria'
WHERE employeeID = 1;
Conditions are used to limit query results to return a subset of a table. A condition is usually specified by a WHERE or HAVING keyword.
Run a select all query to see the changes made.
SQL conditions are used to limit query results to return a subset of a table. A condition is usually specified by a WHERE or HAVING keyword. In this article, we'll only focus on the WHERE keywords.
Select all columns of the first employee.
SELECT * FROM employeeRecords WHERE employeeID = 1;
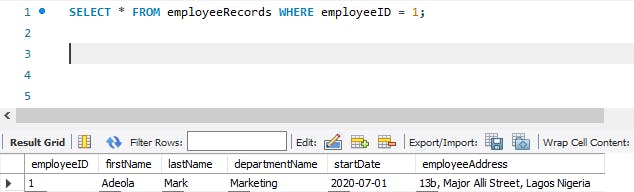
Notice that we used the WHERE keyword to limit our select statement.
When updating records in a table, always include a condition to avoid overwriting data and data loss. If you do not specify the WHERE clause, ALL records will be updated!
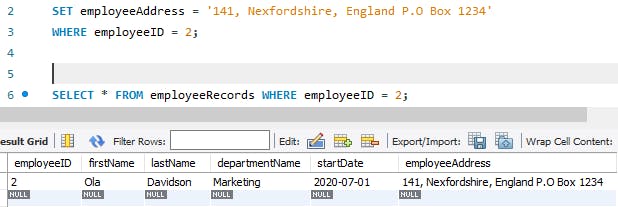
Update the employeeAddress column for the second employee.
UPDATE employeeRecords
SET employeeAddress = '141, Nexfordshire, England P.O Box 1234'
WHERE employeeID = 2;
Then select all columns for the second employee.
Conclusion
In this post, we:
modified a table in SQL by adding a new column;
updated records in a table and
reviewed SQL conditions, rows and columns.
I hope to see you next time!